December 11, 2014

The last ABC Garden Group get-together of the year has been, in the past, a potluck supper held at a member’s home. This year we decided to try something different and meet, instead, at our usual “watering hole,” the Athol Public Library. Everyone was encouraged to bring their favorite holiday finger food – sweet or savory – to share for an evening of fellowship and good cheer.

We never get together without trying to learn something new, and our December meeting was no exception. Sue Bockelman, aka the Plant Pro, has shared her knowledge and expertise with us throughout this past year in workshops and Library gardening classes. As part of our December get-together, Sue offered to help folks make holiday centerpieces. She brought evergreen boughs, flowers, florist’s foam and decorations while members contributed their own containers and creativity. Thanks to Julie McKerracher who took the following pictures showcasing the beautiful results!

Our next get-together will be on Tuesday, January 8th at 6:30 p.m. at the Athol Public Library, and the topic will be “Extending the Season – Hoop Houses, Cold Frames and Row Covers.” Everyone who is currently using one of these season extenders is encouraged to come and share pictures and experiences with the rest of the group in a round robin discussion. See you all in 2015!

photo 1

photo 2

photo 3

photo 4

photo 5

Photo 6

Photo 7

Photo 8

The good news is that this year’s First Frost award isn’t going to Vern and Amy Spencer, and this year’s first frost is much later than last year’s (September 27th this year versus September 10th last year). The bad news is that this year’s recipient is Janet Benoit with a low of 30 degrees on September 27th. We all know how Janet struggles with her colder-than-average micro-climate, but we hope that a little recognition of the trials and tribulations she suffers will be of some comfort! Congratulations (?), Janet!

2013 ABC First Frost Award

Honorable mentions go to Vern and Amy Spencer in Cocolalla with a low of 29 on October 3rd, Marie and Roy Rambu in Athol with a low of 23 on October 4th, and Jeanne and Al Sliva in Bayview with a low of 28 on October 4th. I don’t know about the rest of the group, but this is one contest I’m happy to lose!

I belong to a wonderful group of women called the Careywood Sew ‘n’ Sew Club. We get together once a month at a member’s home for lunch and fellowship (not gossip!), and this past month was my turn. Since the lamb roast was taking a lot longer in the oven than I’d planned on, we took a stroll through my new and improved yard (I’ll post about that sometime soon). Several of the ladies admired my blooming Michaelmas daisies which led to a conversation about fall blooming flowers.

I think we’d all like to have flower borders that bloom right up to the first snowfall though that’s probably not a reasonable expectation here in the northernmost corner of Idaho. We can, however, have something in bloom right up to the first killing frost if we do our research and incorporate fall bloomer into our borders.

As with all plants, the real trick with fall blooming plants is to incorporate them into your flower borders in such a way that they support the rest of your spring and summer bloomers without looking dull or out-of-place while you wait for them to take center stage in the fall. This requires that you pay attention not just to bloom time and color but also to the ultimate size and shape of the plant. One of my first attempts at adding Michaelmas daisies to my kitchen garden border was not as successful as it could have been because I hadn’t taken into account how big the plant would get. Long before the daisies bloomed beautifully blue in September, the plant had completely hidden the shorter marigolds behind it. I had violated the “tall plants in back, short plants in front” rule because all I was thinking about was when the plant bloomed.

When planning for fall blooms, don’t forget that there are shrubs that bloom in the fall. In a mixed shrub and perennial border, the shrubs form the backbone of the garden design. Fall blooming shrubs can be mixed in with the spring and summer blooming shrubs and perennials providing a restful green backdrop until they come into their own at the end of the growing season.

With the help of Google and one of my favorite gardening websites — the Missouri Botanical Gardens — I did some research on fall bloomers.

Shrubs:

As you might imagine, this is a relatively short list and many of them are only reliably hardy to Zone 5 (average lowest winter temperature -20), but if you pay attention to micro-climate, you may find a warm, protected spot in your yard where one of these would fit right in.

Seven Son Flower Shrub:
http://www.missouribotanicalgarden.org/PlantFinder/PlantFinderDetails.aspx?kempercode=k450

Caryopteris:
http://www.missouribotanicalgarden.org/PlantFinder/PlantFinderDetails.aspx?kempercode=e232

Summer Sweet (Clethra alnifolia) – hardy to Zone 3:
http://www.missouribotanicalgarden.org/PlantFinder/PlantFinderDetails.aspx?kempercode=c230

Witch Hazel (Hamamelis virginiana) – another one that ‘s hardy to Zone 3:
http://www.missouribotanicalgarden.org/PlantFinder/PlantFinderDetails.aspx?kempercode=a749
This useful shrub provides bloom at either end of the season. Hamamelis virginiana blooms at the end of the year while vernal witch hazel (Hamamelis vernalis) blooms at the beginning. I have added vernal witch hazel to one of my new borders as an experiment to see how early in the growing season I can have something in bloom. I’ll keep you posted.

Perennials:

There is quite a list of flowers that bloom in August through first frost including some bulbs. Many of these, like the Russian Sage and sedums I’m so fond of, have attractive foliage that let them “back up” the summer bloomers until it’s time for them to strut their stuff in the fall.

Russian Sage (Perovskia):
http://www.missouribotanicalgarden.org/PlantFinder/PlantFinderDetails.aspx?kempercode=z250
Don’t be fooled into thinking this beauty has died because it didn’t pop up and start growing immediately in the spring! It’s a slow starter and will come on later.

Gentian:
http://www.missouribotanicalgarden.org/PlantFinder/PlantFinderDetails.aspx?kempercode=k320

Japanese Anemone “Prinz Heinrich” or “Prince Henry”:
http://www.missouribotanicalgarden.org/PlantFinder/PlantFinderDetails.aspx?kempercode=e134

Michaelmas Daisy (actually in the aster family):
http://www.missouribotanicalgarden.org/PlantFinder/PlantFinderDetails.aspx?kempercode=b149
Michaelmas Daisies are some of my most favorite fall blooming plants! I love the bright pop of blue when everything else seems to be blooming in the red/orange/yellow range.

Sedums:
http://www.missouribotanicalgarden.org/PlantFinder/PlantFinderDetails.aspx?kempercode=t610
http://www.missouribotanicalgarden.org/PlantFinder/PlantFinderDetails.aspx?kempercode=a736
http://www.missouribotanicalgarden.org/PlantFinder/PlantFinderDetails.aspx?kempercode=q180
Got lots. Love ’em. Need more.

Boltonia (False Aster):
http://www.missouribotanicalgarden.org/PlantFinder/PlantFinderDetails.aspx?kempercode=b869

Chinese Lanterns:
http://www.perennials.com/plants/physalis-alkekengi.html
This little devil doesn’t actually bloom in the fall, but its bright orange lanterns are at their best in the fall. It is an aggressive underground spreader so you’ll want to corral it in a pot or put it in a place where you don’t mind seeing a lot of it!

Fall Crocus (Colchicum):
http://www.missouribotanicalgarden.org/PlantFinder/PlantFinderDetails.aspx?kempercode=d539
This fall blooming lovely will fool you! It comes up in the spring and then appears to die back without blooming. Just when you think you’ve been well and truly bamboozled by a slick talking bulb salesman, along comes September and suddenly the bulbs put out flower stalks (no leaves, just the flower stalk) of gorgeous blossoms and one of the prettiest is “Water Lily”.

Chrysanthemum:
http://www.missouribotanicalgarden.org/PlantFinder/PlantFinderDetails.aspx?kempercode=a985
Although these plants are perennials (in Zone 5), most of us buy them as annuals for planting in pots or the border to replace annuals that are tired (or dead!) by September. I have them growing in my back deck planters right now, and I know I’m going to miss them when frost finally stops the show.

Goldenrod (Solidago):
http://www.missouribotanicalgarden.org/PlantFinder/PlantFinderDetails.aspx?kempercode=m400
Not the source of the pollen that torments hay fever sufferers (that honor belongs to ragweed), goldenrod is a wonderful pop of yellow in my own fall garden.

When thinking of fall blooming plants, don’t forget those generous flowers that start blooming earlier in the summer and don’t give up till the first hard frost knocks them down. These include, in my garden: snapdragons, zinnias, marigolds, tickseed, love-lies-bleeding, kiss-me-over-the-garden-gate, anise blue hyssop and hummingbird mint.

It’s tempting sometimes to envy those who live much further south where winter blooming flowers are a possibility, but, frankly, by the time the snow begins to fall around here, I’m looking forward to a few months of R & R (rest and reading). I guess that extending my bloom season into fall is about as far as I care to go.

In closing, I’d like to share with you one of my favorite poems about fall (I think I learned it in the Third Grade under the kind but stern tutelage of Mrs. Anna Parks).

SEPTEMBER

Helen Hunt Jackson (1830-1885)

The golden-rod is yellow;
The corn is turning brown;
The trees in apple orchards
With fruit are bending down.

The gentian’s bluest fringes
Are curling in the sun;
In dusty pods the milkweed
Its hidden silk has spun.

The sedges flaunt their harvest,
In every meadow nook;
And asters by the brook-side
Make asters in the brook.

From dewy lanes at morning
The grapes’ sweet odors rise;
At noon the roads all flutter
With yellow butterflies.

By all these lovely tokens
September days are here,
With summer’s best of weather,
And autumn’s best of cheer.

As an update to my previous post, I wanted to make sure you are all aware of two more garden tours coming up in July. Garden tours are a wonderful way to find out what grows in your area (and, if you don’t see it in anyone’s garden, maybe what doesn’t!). It’s also a way to expand your gardening aesthetic. Maybe you find the traditional “cottage” garden too messy and crowded for your taste or the minimalist “stone and succulent” approach too cold so, on any given garden tour, you may not like every garden you see. On the other hand, you may find that, by viewing someone else’s idea of beauty, you’ll find new ways to express your own inner garden artist. Even if you don’t see anything you like or find interesting, a garden tour is great exercise both for body and for your map-reading skills (GPS is cheating!).

The Bonner County Gardeners Association will be hosting their 2013 Garden Tour on Sunday, July 7. See the link under Broader Horizons on the lower left for more information. You’ll see six gardens on this tour – two in Sandpoint and three in Sagle and the price is right at $10.00 for the day (children are free).

The Coeur d’Alene Garden Club marks their 16th year of garden tours with the 2013 Garden Delights tour (again, the link is under Broader Horizons on the lower left) of five gardens in the Coeur d’Alene area on Sunday, July 14. Tickets (Advance – $15, Tour Day – $17) are available at a number of local businesses as well as at the gardens themselves on the day of the tour.

So, if you’re wondering what to do in July (besides weeding, watering, planting, harvesting, etc.), you might want to consider a garden tour!

Good morning!

It’s my pleasure to invite you all to the 9th (I can’t believe we’ve been doing this for nine years!) annual Careywood Sew ‘n’ Sew Club garden tour. This year we are looking at spring gardens in June (next year we’ll be back to summer gardens in July), and I think you’ll enjoy the gardens as well as the camaraderie and the lunch! The complete invitation and map can be found at the link under Bits and Bobs on the left.

I hope you can find time on the 26th to join us. If you plan to do so, please help us to plan for the luncheon part of our tour by calling or emailing either Janet Benoit or me (contact information is on the invitation) with your RSVP.

I look forward to seeing many of you on the 26th!

Marrion

I love where we live. The panhandle of Idaho is situated between two mountain ranges -– the Selkirks to the west and the Cabinets — the northern extension of the Bitteroots — to the east. The region is heavily forested and has a wealth of water resources in the form of lakes — Lake Pend Oreille, Priest Lake, Lake Coeur d’Alene — and rivers – the Kootenai, the Clark Fork, the St. Joe, and the Coeur d’Alene rivers. I guess it’s not surprising that boating, skiing, snowmobiling, hiking and other outdoor activities are pursued with passion here.

While natural beauty abounds on all sides, the region is generally also hospitable to those who want to create a little “unnatural” beauty in the form of gardens. According to one of the USDA zone hardiness finder websites, our region ranges from zone 5a to zone 6a depending on location which is a heck of lot warmer than where I grew up in central South Dakota (zone 4 – if you were lucky!). Keep in mind, though, the USDA hardiness zones are only intended to give you a sense of your average minimum low temperature (-10 for zone 6a and -30 for zone 4a) so that you can tell whether or not a plant will “over winter” in your area. Knowing your hardiness zone is a good thing, but it isn’t going to tell you whether or not a plant will flourish during your summer growing season.

There’s one area in which South Dakota, despite harsh winters, is way ahead of the Idaho Panhandle and that’s summer night-time temperatures. Summers are hot in the central northern plains — 90-100+ degrees during the day with night-time temperatures “cooling” to 70-80 degrees. While this sounds fairly ghastly as far as human comfort goes (Believe me, ghastly just doesn’t cover it!), heat-loving plants like tomatoes, peppers, melons, eggplant, etc. just lo-o-o-ve it! In fact, some plants (like the aforementioned tomatoes) won’t even ripen fruit if the night-time temperatures fall below 60 degrees.

So, what’s a tomato loving gardener to do in the Panhandle? Why, build a greenhouse of course! It is my considered opinion that, where we live, every gardener should have a greenhouse. Now, don’t start hyper-ventilating! I’m not talking about a Victorian conservatory that costs more than your house and requires a staff to maintain and operate. My Cattle Panel Greenhouse cost me about $250 to build and has grown everything from tomatoes to sweet potatoes successfully with minimal daily effort. Basically, I open the greenhouse doors in the morning, close them at night and water/fertilize as needed. Word to the Wise: It doesn’t rain in the greenhouse! Plants do die if you don’t water them so make sure you give your greenhouse plants at least the equivalent of an inch of rain a week. I water my entire garden including the greenhouses (Yes, I have more than one. Aren’t you just eaten up with envy?!) on a regular schedule that prevents greenhouse plant desiccation.

A couple of notes before we start. My cattle panel greenhouse is designed to be a permanent structure. Some cattle panel greenhouse plans are for structures that can be towed from place to place, but this isn’t one of them.

One of my biggest problems with most cattle panel greenhouse designs is the tendency of the greenhouse to collapse under the weight of winter snow. I solved that problem with a sturdy doorway at both ends that supports a king rafter to hold the cattle panels up. As a result, I can leave the plastic on my greenhouse all year round and start cool season crops in February when the ground is still covered in snow.

Another note on greenhouse plastic – buy greenhouse plastic! Don’t go to local big box store and buy the 6 mil clear construction grade plastic. It won’t last even a single season, and you’ll spend the rest of your life picking up little bits of sun-degraded plastic all over your garden. Spend the extra bucks and get heavy duty UV resistant greenhouse plastic; you’ll save money and aggravation in the long run.

I’m a little claustrophobic so some of the cattle panel greenhouse designs out there created an interior space that was just too confined for my taste. So, using a hint I picked up on another “cattle panel” website, I added an additional 6-8 inches to the height of the roof of my greenhouse (you’ll see how below) which makes both me and my plants a lot happier.

Finally, I should point out that, to a greenhouse purist, my little structure is technically just a big cold frame. It doesn’t have supplemental heating or ventilation so it’s not a “real” greenhouse. I’m happy to report that my tomatoes don’t know the difference!

Enough preamble! Let’s take a look at how you can get a greenhouse of your very own!

Cattle Panel Greenhouse Plans

Materials List:

3 (4’4” x 16’) cattle panels
5 12’ treated 2×10 boards
5 12’ treated 2×4 boards
4 8’ treated 4×4 posts
4 2’ x 8’ sheets of clear, corrugated PVC roofing
2½” deck screws
1½” deck screws
¾” deck screws
large fencing staples
greenhouse plastic – 20’ long x 20’ wide (or thereabouts)
worn out soaker hose
duct tape
36+ feet of 1×2 boards to act as slats to fasten the greenhouse plastic to the bottom support boards and door frames
hinges for doors
rope or baling twine for pulling the cattle panels together into a hoop

Tools:

cordless drill driver with both drill bits and Phillips head screwdriver bits
hammer
level
50’ tape measure
post hole digger
circular saw
sledge hammer
scissors

(1) Carry your materials and tools to the permanent location of your greenhouse. This location should be relatively level. You can adjust for some slight sloping by banking soil around the bottom of your greenhouse walls, but too much slope means the soil will just run out of your greenhouse and down the hill. Also, make sure your location isn’t shaded significantly by trees, walls, etc. or you’ll be cutting down on your solar gain.

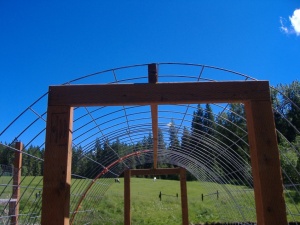
(2) Bend the cattle panels to shape by tying rope (or baling twine) to one end and looping it through the other. Then pull the rope so that it draws the two ends together. Have someone help turn the cattle panels until they are standing up correctly. Then continue to tighten the rope until the cattle panels are the right height. Make sure you have room to stand under the middle with about 4 inches extra (there will be a 2×4 king rafter holding up the middle of the cattle panels).

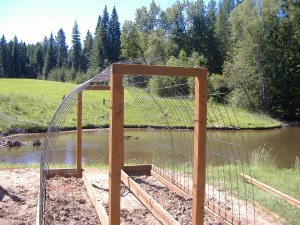
(3) Once you’ve established the height of the first cattle panel, get your next cattle panel and overlap it over the end of the first cattle panel by one section or grid and secure the two panels together. You will want to use a rope to set the arch of the second panel as well, but be sure you run the rope for the second panel through the overlapped grids of both panels when you do. You can fasten the two panels together with zip ties, duct tape or by wrapping the two panels together with bailing twine (or any combination thereof). Repeat this step for the third cattle panel. When you are done, you should have a “hoop house” that is 12’ long by approximately 6’ 4” high by approximately 6’ wide. Locate your hoop house where you want it to remain. Remember, this greenhouse is designed to be a permanent installation.

(4) Next, you need to assemble the sides of the greenhouse. Take one of your 12’ 2×10 boards and place one of your 12’ 2×4 boards on top of it even with one of the edges making a ledge for your cattle panels to rest on. Repeat to make the other long side of the greenhouse.

Greenhouse Picture #3 - Sidewall and end wall

(5) Using your circular saw, cut a rabbet in the end of each of the four 8’ 4×4 posts to allow you to inlet a 2×4 board at the top of the post.

Doorway Detail

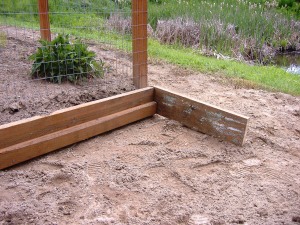
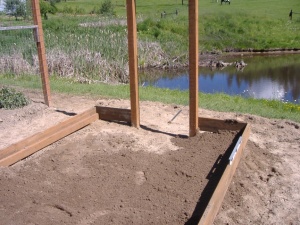
(6) Using a post hole digger, dig four post holes for the 8’ 4×4’s just under the lip of the short ends of the hoop house. They should be spaced so that there is a gap of 2 feet between them which will make them approximately 21 inches in from each long side as shown below:

Greenhouse 2

(7) Cut two 31” pieces of 2×4 board and fasten them to the tops of the 4×4 posts with deck screws flush with the outside of the posts. In addition to forming the top of the door or window frame, these 2×4’s will support the 2×4 king rafter that will keep the hoops from collapsing under a snow load.

Greenhouse 3

(8) Take one of the three remaining 2×8’s and cut it into four 22 1/4″ boards with one 27 1/2″ board remaining. Fasten the 22 1/4” boards so that the end that meets the long side board is flush with the end of it and the end that fastens to the 4×4 post has a gap of 1 3/4”. This gap will leave room for the doors to open and close.

NOTE: While fastening the end pieces, you might want to employ your tape measure to make sure the greenhouse remains reasonably square.

(9) Once you’ve completed the framework of the greenhouse, you can slide your cattle panel hoops over it. This is a bit tricky and can take 2-3 people, but once you have the ends of the hoops resting on the top of the 2×4, fasten the bottom edge to the 2×8 with fencing staples.

DSCF3409

(10) At this point, you can fasten down the side walls of the greenhouse so that the whole thing doesn’t lift up and go rolling down the hill in the first stiff breeze. Locate your six pieces of rebar at the ends and middle of each long side of the greenhouse and pound them into the ground using the sledge hammer. Pound them down so that they are under the top edge of the 2×10 and, so, will not come in contact with the greenhouse plastic to tear it. Using the screw gun, 1 1/2” deck screws and pipe brackets, fasten the rebar, top and bottom, to the end boards.

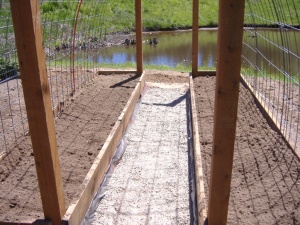
(11) You can see that I boxed in my greenhouse beds and covered the path between with landscape fabric and gravel. I plan to add stones or concrete pavers to the path to act as a heat sink and to increase weed suppression.

Greenhouse 4

(12) It’s unlikely you’ll find a ready made door to fit your greenhouse so you’ll have to build one using 2×4’s and the clear PVC panels. Measure your door opening and cut two long and two short pieces of 2×4 to fit the opening. Cut the ends of the 2×4’s to make lap joints:

Greenhouse 5.jpg

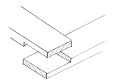
Use 1/2″ deck screws and glue to fasten the 2×4’s together. Once the the frame is assembled, you can cut pieces of clear, corrugated, PVC roofing to fit the door and fasten your hinges to one side.

Note: I needed to put more cross-bracing on my 2×4 door. The lap joints alone didn’t keep door from racking/warping so now I have to take the whole thing apart and reinforce it to stay square! Diagonal bracing is definitely a necessity.

(13) The last step before putting your greenhouse plastic over the frame is to cover the ends of the cattle panels with soaker hose. Split the soaker hose down one side and slip it over the ends of the cattle panel hoops from one side the other. If they aren’t tight enough to stay put on their own, use duct tape or zip ties to fasten them to the cattle panels. This will protect the greenhouse plastic from getting torn.

(14) Finally! It’s time to fasten the plastic to the frame! Use the piece of plastic you’ve cut and position it over the frame so that it is centered from front to back and side to side. Staple the plastic in place temporarily in place on the bottom support boards and around the door frames. Then, screw the 1×2 boards over the ends of the plastic on the sides and around the door frame to more permanently hold down the plastic.

The picture below doesn’t really do justice to the finished greenhouse, but it does show a few features. You can see the soaker hose covering the sharp edges of the cattle panels, and you can see how the plastic wraps about to the door frame edges. You can also just barely see the greenhouse door on the right.

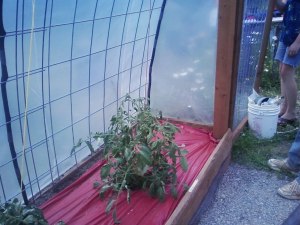
This was the first year I used this greenhouse to grow tomatoes (hence the red plastic mulch intended to promote the ripening of fruit). You can’t see them (they’re under the plastic), but I used drip irrigation to water the plants and bailing twine to trellis them. You can just see the yellow bailing twine on one of the plants on the left.

Greenhouse 6

So, do not despair! You don’t have to give up salsa just because you live in an area more suited to berries than tomatillos. You too, Virginia, can have a greenhouse.

Though the skies are overcast and we are still regularly threatened with snow, this is the time of the year when the thoughts of gardeners turn to seed starting. Starting your own fruit, flower and vegetable plants from seed lets you explore a wider world of cultivars and varieties that aren’t available from local greenhouses or nurseries. After all, these businesses have to sell what they grow to the general public so they can’t afford to devote a lot of shelf space to rarities. But once you venture into starting your own plants from seed, you can indulge your horticultural fancies to your heart’s content.

Those with lots of south facing windows and deep sills may be able to start seeds in those windows, but most of us need some artificial lighting help in order to be successful. For years I regularly lusted after seed starting light tables like the ones marketed by Gardeners Supply (below). Unfortunately, its $649.00 price tag has always made it and others like it beyond my reach.

Seed Starting Light Table

However, as the old saying goes, “where there’s a will, there’s a way.” About ten years ago, I came up with a relatively low cost alternative you might like to try.

My seed starting light table begins with a set of chrome wire shelving that is four feet long, 54 inches high and 18 inches deep like this one on the right. 856607004008lg I found this particular set of shelves at lowes.com on the internet for $100, but sometimes you can find the same type of shelves on sale at your local big box store (LBBS). For convenience sake, I also added a set of castors to make moving the table around easier.

Shop Light
The artificial light for my plant table is provided by six of the cheapest florescent shop lights I could find, the kind that you hang with chain from a hook in the ceiling. Again, here’s a picture of one type available at your LBBS for $9.93 each. Six of these light fixtures adds another $59.58 to the price of the light table.

Buying regular 4’ fluorescent light bulbs by the twelve-pack saves money, and it’s been my experience that the regular fluorescent bulbs work just as well as the so-called “gro-light” bulbs. If you buy a twelve-pack of 4’ bulbs, that’s another $36.98.

The last two components of the light table link everything else together. A six outlet power strip is a minimum to plug in all of your shop light fixtures. You can find these for as little as $3.74 at, you guessed it, your LBBS. Power Strip 2


Digital TimerFinally, to turn the lights on and off, you’ll need a three-prong timer like the digital timer I bought to run my light table this year from Amazon.com. You can do without the timer if you’re always home and meticulous about turning the power strip on and off, but I know my limitations so I have a timer which set me back another $18.73.

You’ll need some miscellaneous items like six 12” lengths of chain so that you can raise and lower the light fixtures to be close to your seedlings and six additional “S” hooks to hang the lights. I’m estimating that this miscellaneous category is another $5.00.

So, for about $225 (or less depending on whether or not you find things on sale or you already have shop lights around the house), you can set up a seed starting light table of your own like mine.
That’s a savings of $424 over the fancy model from Gardeners Supply!

Completed Seed Starting Shelves

Here are a couple of close-ups of how I zip tied the power strip to one of the shelving posts and of how the the shop lights are connected to the shelves via the chains and “S” hooks.

Power Strip Hanging Lights

This spring, I put my shelves to use early on starting perennial and annual flowers. The blue-eyed grass (not a grass but a native iris), pink soapwort, and nicotiana (flowering tobacco) are already coming up (I’m sooooo excited!), and this weekend I’ll be planting up several varieties of cauliflower. I admit that getting a great plant table at a huge savings just warms the cockles of my stingy little heart, but watching those little green seedlings peeping out of the soil is the real payoff!

I hope to put the finishing touches on garden clean-up around here this week as soon as it stops raining. (No, I’m not done yet. Yes, I know it’s nearly November.) While I wait for this autumn deluge to end, I am already thinking of spring and pondering what new varieties to try, and as I page through the early seed catalogs, I am torn between zones. To understand what I mean, take the following test.

Open the browser of your choice and enter your zip code in the “Zip Code” field on each of the following two websites:

http://www.garden.org/zipzone/

http://planthardiness.ars.usda.gov/PHZMWeb/

The first website is the National Gardening Association website while the second belongs to the United States Department of Agriculture (USDA). I just did that very thing using my Careywood zip code of ‘83809’ and guess what? The National Gardening Association and the USDA do not agree on the cold hardiness zone for Careywood!

The National Gardening Association still lists my cold hardiness zone as 5b which is any area where the annual average winter low temperature doesn’t fall below -15 degrees F. This is the same cold hardiness zone that Careywood (and Bayview and Athol) have been associated with for as long as I’ve lived in Idaho (20+ years).

However, the USDA has decided this year that life in Careywood and the surrounding environs is a lot warmer than they’ve been telling us for the past umpteen years. Now when you enter ‘83809’ into the zip code field on the USDA website, it pops up 6a with annual average winter low temperatures that don’t fall below -10 degrees F. Yikes! Holy global climate change, Batman!

Most of you are probably asking yourselves, so what? When the temperature is below zero (which is just plain too darn cold, thank you very much!), what difference will 5 degrees make one way or the other? Well, the answer is probably not much to humans, but, with plants that 5 degrees can be the difference between one that survives the winter and one that doesn’t.

The USDA cold hardiness zone map was first established in 1960 as a way for gardeners to match their climate with the climate in which a plant is known to grow well. I guess the USDA didn’t think that we gardeners north of the 25th parallel could figure out by ourselves that we shouldn’t try to grow bananas.

Now, mind you, I’m not saying that the cold hardiness zone map has not been useful as a general guide, but with the recent reassignment of our area from one zone to another, I’m beginning to wonder how seriously we really need to take this. I don’t know about you, but it hasn’t seemed all that much warmer at my house in recent years despite a relatively mild winter this year. I’m probably not going to run right out and start replacing my peonies (hardy to Zone 2!) with blue mist spirea (hardy to Zone 6).

On the other hand, I’ve been known to try a Zone 6 plant now and then when I had a protected spot for it and the ability to provide a little additional winter protection. A south or southwest facing wall or a spot where two buildings come together to form a cozy nook protected from winds out of the northwest can provide a Zone 6 micro-climate for the adventurous gardener.

Sure, I sometimes lose that Zone 6 darling to extreme weather conditions, but I’m philosophical about my losses. Life is about risk, and gardeners and farmers understand that as well as anyone. Every year we put seed and plants in the ground then water, weed, fertilize and battle the critters for the harvest. Some years we’re more successful than others, but we don’t stop trying just because of a crop or plant failure. In the end, I think it’s the persistence of the gardener that determines success more than the hardiness zone assigned to us by a bureaucrat in Washington, D.C.

“We come from the earth, we return to the earth, and, in between, we garden.”

Anonymous

According to The Farmer’s Almanac, this year’s autumnal equinox on September 22nd at 7:49 A.M. (PDT) was our earliest since 1896. Since then, our days have been getting shorter while our nights have been getting longer and that process will continue until the winter solstice on December 21st. It seems a pity that the days are getting shorter just when there is so much work to be done in the garden!

I know that most of you have already been “frosted out.” I, too, have had enough frost that the tender plants – tomatoes, peppers, squash, beans, etc. – have “bit the dust.” My cold hardy flowers and vegetables are stilling going strong thanks to the unseasonably warm weather we’ve been having, but I know that winter is coming, and it’s time to get the fall clean-up done. It’s time to “put the garden to bed” so that, in the spring, I’ll be ready to go as soon as the soil is warm enough to be worked.

In my garden, fall clean-up consists cleaning up existing garden beds and borders, cleaning and putting away gardening equipment and fall planting.

Cleaning up existing garden beds and borders involves more than just pulling up spent plants and feeding them to the chickens or throwing them on the compost pile. That certainly needs to be done, but, when the beds are bare it’s a good time to have a soil test done and make any amendments needed to insure good soil fertility in the spring. Make sure you cover the soil with a good mulch after fertilizing to keep your soil amendments from washing away into the lake or aquifer during fall rains or spring snow melt. Perennial and shrub borders should be weeded and mulched, but you may want to hold off with any fertilizing until spring since soil amendments at this time of year can cause new growth that will not survive the next below-freezing temperatures headed our way.

At Waterfowl Farm, most of the garden equipment consists of hoses, sprinklers and other watering equipment. These have to be picked up, drained, rolled up and tucked away for next year. Sadly, “they don’t make ‘em like they used to” so this is also the time when I make a list of replacement hoses that will have to be purchased in the spring (or at a fall sale!). I also have some large pots and planters that have to be emptied, washed and stored for next season’s use. Finally, the machinery that makes it possible for me to maintain my little piece of paradise needs to be cleaned, sharpened (in the case of mowers) and tucked away for the winter.

The last big job is fall planting. Now, for those of you who think fall planting is an oxymoron, let me assure you that, even in the wilds of North Idaho, you can successfully plant perennials and shrubs in the fall. In fact, some plants respond better to fall planting! Obviously, we all know that bulbs like daffodils, tulips and hyacinth require fall planting in order to meet their chilling requirement, but other perennials can settle in and get a head start for spring if planted in the fall. Keep in mind that, in the fall, the soil is warmer than our cold, water-logged spring soils so plant roots get busy growing and settling in faster. Just remember to water them in thoroughly and mulch for winter protection.

For a more comprehensive list of fall cleanup tasks, you can find all you wanted to know (and more!) in “Putting the Garden to Bed – A Fall Checklist” under Bits and Bobs (<— look left). Be sure to leave a comment below if you see something we missed!

Enjoy this lovely fall weather by getting out in the garden and getting ready for next spring. This winter, when you’re browsing through those seed and nursery catalogs with your feet up in the recliner, you’ll be glad you did! And just in case you don’t have enough seed and nursery catalogs, check out the “ABC Garden Group Recommended Seed and Nursery Catalogs and Websites” link (also under Bits and Bobs).

The Athol-Bayview-Careywood (ABC) Garden Group hereby awards its first annual “First Frost Award” to Vern and Amy Spencer of Cocolalla, Idaho and Donna Armbruster of Careywood, Idaho. On September 11, the Spencers suffered a low of 21 degrees while Donna Armbruster’s garden sank to 25 degrees F. Honorable mention goes to Janet Benoit of Careywood, Idaho with a low of 28 degrees F. Some of us extend our sympathies while others wish that frost would come to their gardens so they can relax and start planning for next year!

Archives